
How to Create audiences on Facebook

Book a Free Consultation Now
Would you like to know more about this topic?
Contact us on WhatsApp and get a free consultation from our experts
Contact on WhatsApp NowCreate audiences on Facebook means defining and grouping people based on their interests, behaviors, demographics, or previous interactions so your ads reach the right users instead of a random audience. Creating audiences is essential because it improves ad performance, reduces wasted budget, and increases conversions by targeting users who are most likely to engage or take action. This process is done through Facebook Ads Manager by setting audience criteria at the Ad Set level or by using saved, custom, and lookalike audiences. At Nofal Seo, we specialize in building data-driven Facebook audiences that help businesses reach qualified users and achieve measurable advertising results.
What are Audiences on Facebook?
Audiences on Facebook refer to groups of people that advertisers define and target based on specific data such as interests, behaviors, demographics, or previous interactions. When marketers Create audiences on Facebook, they gain the ability to show ads to users who are more likely to engage, convert, or take action, instead of showing ads randomly. This system helps businesses reach the right people at the right time with relevant messaging, improving campaign efficiency and return on ad spend.
Facebook audiences are built using a combination of user data collected from Facebook activity, advertiser inputs, and platform signals. These audiences can include people who visited a website, interacted with a Facebook page, watched videos, or match certain demographic and interest-based criteria. By using audience targeting correctly, advertisers can control who sees their ads and align campaigns with specific business goals.
Audience targeting is closely related to high-search concepts such as Facebook ad targeting, custom audiences, lookalike audiences, saved audiences, Facebook Ads Manager, and audience segmentation, all of which help advertisers refine reach and improve ad performance.
To understand Facebook audiences clearly, it’s important to know how they are structured:
-
Audiences are groups of users collected based on data, not random selections
-
They allow advertisers to target users by interests, location, age, and behavior
-
Audiences help reduce wasted ad spend by focusing on relevant users
-
Different audience types serve different campaign objectives
-
Proper audience definition improves engagement and conversion rates
How to create audiences in Facebook?
Creating audiences in Facebook is a foundational step for running effective ad campaigns, as it determines who will see your ads. When businesses Create audiences on Facebook, they can customize targeting based on user data, previous interactions, or predefined criteria to align ads with specific marketing goals such as traffic, leads, or sales.
The process of audience creation is handled through Facebook Ads Manager, where advertisers can choose between different audience types depending on their strategy. Whether the goal is to reach new users or reconnect with existing ones, creating audiences allows full control over targeting parameters and campaign reach.
This process involves popular search topics like Facebook Ads Manager setup, custom audience creation, lookalike audience targeting, saved audience configuration, and Facebook advertising strategy, all of which are essential for successful campaign execution.
When creating audiences in Facebook, advertisers usually follow these key steps:
-
Access Facebook Ads Manager and navigate to the Audiences section
-
Choose the appropriate audience type based on campaign goals
-
Define targeting criteria such as location, age, interests, or behaviors
-
Upload or connect data sources like website traffic or customer lists
-
Save and name the audience for future campaign use
Step 1: Access the Audiences Section
From Business Tools, select Audiences. This will take you to the Audience management section in Facebook Business Manager.
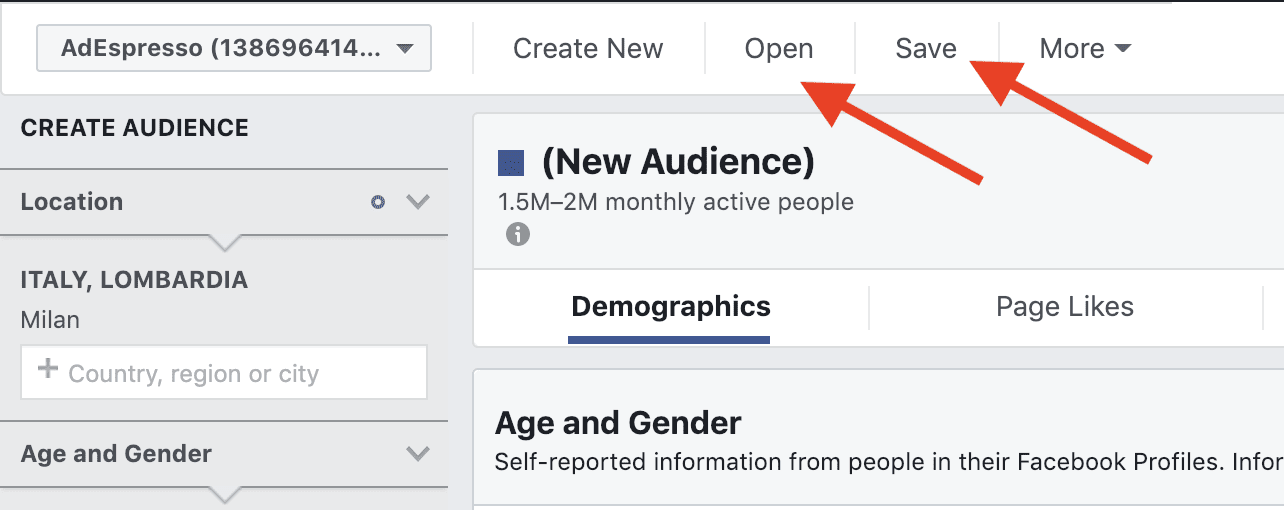
Step 2: Choose the Ad Account
Audiences are created at the ad account level. If you manage multiple ad accounts, click the dropdown arrow and select the ad account you want to work with.
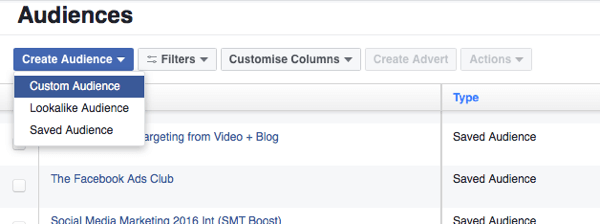
Step 3: Create a Saved Audience
Click on Create Audience, then select Saved Audience. This option allows you to create a new audience from scratch by defining:
-
Location
-
Age range
-
Gender
-
Interests
-
Languages
Once defined, the audience can be saved and reused in future campaigns.
Step 4: Other Audience Types on Facebook
In addition to Saved Audiences, Facebook offers other audience options:
-
Custom Audience: Created from existing data such as website visitors, video viewers, app users, or customer lists.
-
Lookalike Audience: Built from a Custom Audience to reach people similar to your existing customers.
-
Special Ad Audience: Required for certain ad categories such as employment, housing, credit, and political ads in specific regions.
Step 5: Finalize and Save
After setting all targeting options, save the audience. It will then be available for use in any future campaign within the selected ad account.
How to create an audience profile?
An audience profile helps advertisers clearly understand who they are targeting and why. When marketers Create audiences on Facebook, building a detailed audience profile allows them to define user characteristics such as age, location, interests, pain points, and online behavior. This clarity ensures that ad messaging, creatives, and offers are aligned with the audience’s expectations, which significantly increases engagement and conversion rates.
A well-built audience profile is not based on assumptions but on real data and analysis. Agencies like Nofal Seo focus on studying user behavior, ad performance, and platform insights to shape accurate audience profiles. This approach helps businesses avoid broad targeting and instead focus on users who are most likely to respond positively to ads, making campaigns more cost-effective and scalable.
Audience profiling is strongly connected to high-intent keywords such as buyer persona, target customer profile, Facebook audience insights, user behavior analysis, and marketing segmentation, which are essential for precision targeting and performance optimization.
To build an effective audience profile, marketers focus on:
-
Identifying demographic data such as age range, gender, and geographic location
-
Understanding user interests, hobbies, and online activities
-
Analyzing customer pain points and motivations for purchasing
-
Reviewing previous ad engagement and website behavior
-
Aligning audience needs with the brand’s product or service messaging
facebook custom audience list
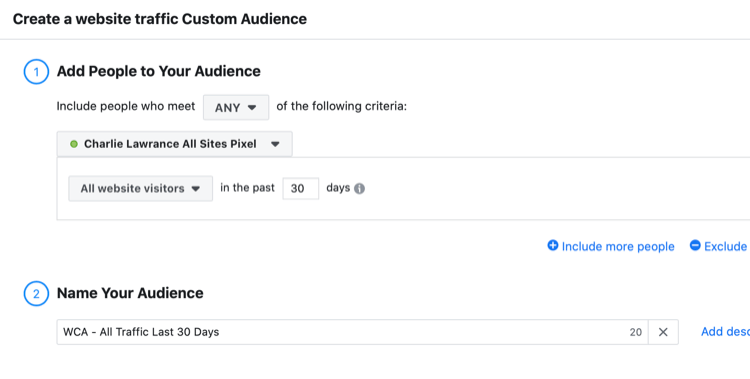
A Facebook custom audience list allows advertisers to target people who already have a relationship with their business. When brands Create audiences on Facebook, using a custom audience list helps reconnect with existing customers, leads, or website visitors, making it one of the most powerful targeting options for remarketing and retention campaigns.
Custom audience lists are usually created by uploading customer data such as email addresses or phone numbers, or by collecting users based on interactions like website visits, app activity, or Facebook page engagement. Digital marketing specialists at Nofal Seo often rely on custom audience lists to build high-performing remarketing funnels that increase conversions while lowering advertising costs.
This targeting method is commonly associated with keywords like Facebook remarketing, customer list targeting, email-based audiences, website custom audiences, and retargeting campaigns, which are critical for improving ROI in paid advertising strategies.
Common types of Facebook custom audience lists include:
-
Customer lists uploaded using emails or phone numbers
-
Website visitor audiences based on specific pages or actions
-
App activity audiences targeting users who installed or used an app
-
Engagement audiences from Facebook or Instagram interactions
-
Video viewers and lead form engagement audiences
facebook custom audiences privacy
Privacy is a critical aspect of Facebook advertising, especially when working with customer data and remarketing strategies. When advertisers Create audiences on Facebook, Facebook applies strict privacy rules to ensure that personal user data is protected and not directly visible or accessible to advertisers. This means that businesses can target audiences based on data, but they never see individual identities or personal profiles.
Facebook custom audiences operate under encrypted data matching, where uploaded customer information such as emails or phone numbers is hashed before processing. Marketing teams like Nofal Seo follow best practices by ensuring data is collected legally, user consent is respected, and privacy policies are clearly communicated. This approach protects both the advertiser and the audience while maintaining effective targeting.
This topic is commonly linked with high-search keywords such as Facebook data privacy, custom audience compliance, GDPR Facebook ads, customer data protection, and advertising privacy policies, all of which are essential for running safe and compliant ad campaigns.
Key privacy principles for Facebook custom audiences include:
-
Customer data is encrypted and matched anonymously by Facebook systems
-
Advertisers never see personal user identities or profiles
-
Audiences must meet minimum size thresholds to be usable
-
Data must be collected with proper user consent
-
Advertisers are responsible for complying with local privacy regulations
how to edit audience list on facebook
Editing an audience list allows advertisers to refine targeting and improve campaign performance over time. When marketers Create audiences on Facebook, they often need to update audience lists to reflect new data, remove inactive users, or adjust targeting criteria based on campaign results and business changes.
Audience lists can be edited directly through Facebook Ads Manager, where advertisers can modify demographics, interests, locations, or data sources depending on the audience type. Performance-focused agencies such as Nofal Seo regularly optimize audience lists by analyzing engagement data and removing low-performing segments, ensuring ads reach the most relevant users possible.
This process involves popular search terms like edit Facebook audiences, audience optimization, update custom audiences, Facebook Ads Manager targeting, and campaign performance improvement, which are essential for scaling successful ad strategies.
Steps commonly taken to edit an audience list on Facebook:
-
Access the Audiences section inside Facebook Ads Manager
-
Select the specific audience you want to modify
-
Update targeting criteria or data sources as needed
-
Remove outdated or underperforming segments
-
Save changes and monitor performance after editing
create custom friends list facebook
Creating a custom friends list on Facebook helps users organize connections and control who sees specific posts or content. While many marketers Create audiences on Facebook for advertising purposes. custom friends lists are more focused on content visibility and relationship management rather than ads. These lists allow users to group friends based on criteria such as family, colleagues, or close contacts, making communication more targeted and intentional.
Custom friends lists are often used alongside broader audience strategies to maintain privacy and relevance. Digital marketers at Nofal Seo understand how audience segmentation—whether for ads or personal content—plays a key role in improving engagement and message clarity. Organizing connections properly helps users deliver the right message to the right people without unnecessary exposure.
This topic is commonly related to search terms such as Facebook friends list management, custom privacy settings Facebook, Facebook audience controls, content visibility settings, and social media organization, which reflect user interest in controlling interactions and privacy.
Before creating a custom friends list, it’s important to understand:
-
Custom friend lists help control who can see posts, stories, and updates
-
Lists can be edited or updated at any time based on changing relationships
-
They improve content relevance by avoiding over-sharing
-
Lists are useful for both personal users and brand page managers
-
Proper list organization enhances privacy and user experience
facebook custom audience api
The Facebook Custom Audience API allows developers and advanced marketers to programmatically create, manage, and update custom audiences. When businesses Create audiences on Facebook, using the API enables automation, scalability, and real-time audience updates without manual uploads, which is especially useful for large datasets or ongoing campaigns.
The API is commonly used by marketing agencies like Nofal Seo to integrate Facebook advertising with CRM systems, websites, and marketing automation tools. This integration ensures that audience data stays updated, improves targeting accuracy, and allows businesses to react quickly to user behavior, such as purchases or lead submissions.
This advanced feature is strongly associated with keywords such as Facebook Marketing API, custom audience automation, CRM integration Facebook ads, server-side tracking, and advanced Facebook advertising, which are frequently searched by performance marketers and developers.
The Facebook Custom Audience API is mainly used to:
-
Automatically upload and update customer data securely
-
Sync audiences with CRM or email marketing systems
-
Create dynamic remarketing audiences in real time
-
Reduce manual work and human error in audience management
-
Scale advertising efforts with advanced targeting control
How to Determine the Audience for Your Facebook Ads
Determining the right audience is one of the most important steps in creating a successful Facebook advertising campaign. Proper audience selection ensures that your ads are shown to people who are most likely to engage, convert, or take action.
Step 1: Create a New Campaign
From the Campaigns page inside Facebook Ads Manager, click on Create. This will open the Create New Campaign screen where you can start setting up your advertising campaign.
Step 2: Choose a Campaign Objective
On the Choose a Campaign Objective page, select the objective that matches your goal. For example, choose Messages if your aim is to receive direct messages from potential customers. After selecting the objective, click Continue.
Step 3: Name Your Campaign
A new campaign setup page will appear, prompting you to enter a name for your campaign. Once the campaign name is added, click Next to proceed. At this point, you will be taken to the Ad Set level, which is where audience targeting is defined.
Step 4: Define Your Target Audience (Ad Set Level)
At the Ad Set level, you can define your audience based on a Buyer Persona. A Buyer Persona helps you identify your ideal customer by specifying:
-
Age
-
Gender
-
Location
-
Interests
-
Behaviors
This step ensures that your ads are shown to users who match your target customer profile.
Step 5: Use Saved Audiences (Optional)
It is possible—and often recommended—to create audiences before launching a campaign. If you have already created and saved audiences. you can select Use Saved Audience and choose from your previously saved audience lists instead of creating a new one each time.
Step 6: Select an Existing Audience
When creating audiences on Facebook, a list of saved audiences will appear. You can simply choose the audience that best fits your campaign goals.
Step 7: Review and Exit the Setup
If you exit the setup process without publishing, Facebook may prompt you with a message such as Publish draft items. You can close the setup safely without publishing if you are still preparing your campaign.
Note: It is best practice to create and save your audiences before starting the campaign to save time and ensure consistent targeting.
Do you need a consultation about this topic?
Contact on WhatsApp