
Facebook page how to create manage and grow

Book a Free Consultation Now
Would you like to know more about this topic?
Contact us on WhatsApp and get a free consultation from our experts
Contact on WhatsApp NowA Facebook page is a public business profile on Facebook designed for brands, companies, and public figures to connect with a wide audience, publish content, run ads, and analyze performance through built-in insights. Its importance lies in its ability to increase visibility, build trust, communicate with customers, and support scalable digital marketing. At Nofal SEO, we create and optimize Facebook pages as strategic marketing assets by setting them up correctly, improving reach and engagement, and integrating them with data-driven Facebook marketing and advertising strategies that deliver measurable growth.
What Is a Facebook Page?
A Facebook page is a public digital presence designed specifically for businesses, brands, organizations, and public figures to communicate with a broad audience on Facebook. Unlike personal profiles, pages are built for visibility and growth, allowing anyone to follow, interact, and engage without sending friend requests. This structure makes pages ideal for brand awareness, customer communication, and long-term marketing strategies.
Pages also unlock professional tools such as analytics, advertising, call-to-action buttons, Messenger automation, and content scheduling. These features make a Facebook Page not just a social profile, but a complete marketing and communication platform that supports scalable growth.
At Nofal SEO, we help businesses fully understand what is a Facebook page and how to use it strategically. Our focus is not only on setup, but on aligning page structure with business goals, improving reach, increasing engagement, and turning followers into paying customers using data-driven optimization.
Key Characteristics Explained
-
Public and searchable profile
-
Unlimited followers
-
Built-in analytics and insights
-
Advertising and promotion tools
-
Business-focused features
Facebook Page vs Profile: What’s the Difference?
A Facebook page is designed for brands and businesses, while personal profiles are intended for individual use only. Profiles have friend limits, restricted visibility, and no access to advanced marketing tools.
At Nofal SEO, we guide clients on choosing between Facebook page vs profile based on goals. Businesses using pages gain access to ads, insights, and growth tools that personal profiles simply cannot provide.
Main Differences
-
Pages allow ads and analytics
-
Profiles have friend limits
-
Pages support business tools
-
Profiles are for personal use
How Do I Create a Facebook Page?
Creating a Facebook page starts with a personal account, which acts only as an admin—not as the public identity. The creation process allows you to define branding, category, and purpose from the first step, which is critical for long-term performance.
The setup stage directly affects discoverability, credibility, and engagement. Choosing the right category, writing a clear description, and setting visuals correctly improves how Facebook’s algorithm understands and distributes your page.
At Nofal SEO, we specialize in optimizing the Facebook page sign up and create Facebook page process for businesses. We ensure your page is structured to support Facebook page for business growth, search visibility, and conversion-ready design.
Step-by-Step Creation Process
-
Log in to Facebook
-
Go to Menu → Pages → Create New Page
-
Enter Page Name (brand-focused)
-
Select the most accurate category
-
Write a concise, keyword-optimized description
-
Upload profile and cover images
-
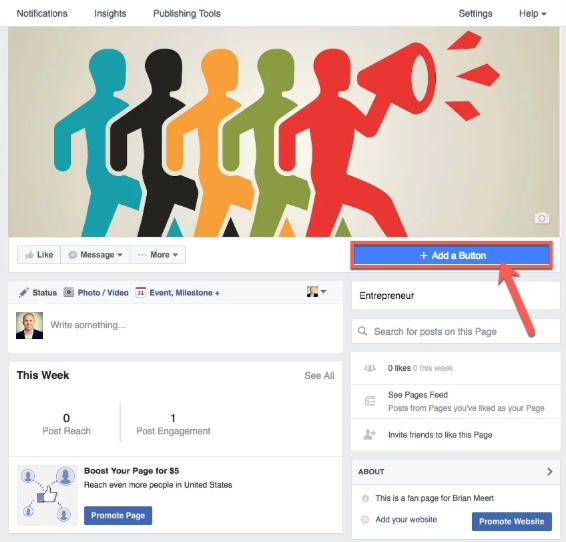
Add contact details and CTA button
How Do I Access a Facebook Page?
A Facebook page can be accessed easily through your personal account by switching profiles. Facebook allows seamless movement between personal and business identities without logging out.
Access control is especially important for teams and agencies managing multiple pages. Proper access setup ensures security, accountability, and efficient collaboration.
At Nofal SEO, we organize Facebook page admin access and Facebook page roles to ensure every team member has the correct permissions without risking page ownership or security.
Step-by-Step Access Instructions
-
Log in to Facebook
-
Click your profile image
-
Select Switch Profile
-
Choose your Page
-
Manage the Page as the brand
How to Manage Facebook Page Professionally
Managing a Facebook page goes far beyond posting content. It includes monitoring messages, responding to comments, tracking analytics, adjusting settings, and optimizing performance based on data.
Daily management consistency is what separates inactive pages from high-performing ones. Facebook rewards active, responsive pages with higher reach and better visibility. Through Nofal SEO, we offer professional manage Facebook page services focused on Facebook page settings, Facebook page analytics, and Facebook page insights to continuously improve engagement and growth.
Page Management Workflow
-
Check notifications daily
-
Reply to Messenger inquiries
-
Monitor comments and reviews
-
Analyze performance insights
-
Adjust content and timing
Posting on a Facebook page is the core of organic growth and audience engagement. Facebook prioritizes valuable, engaging content that encourages interaction such as comments, shares, and saves.
Content types include text posts, images, videos, reels, links, and offers. Each format serves a different purpose in the content strategy. At Nofal SEO, we implement Facebook page marketing plans that focus on content quality, consistency, and strategic timing, combined with boost Facebook page posts when needed.
Posting Steps
-
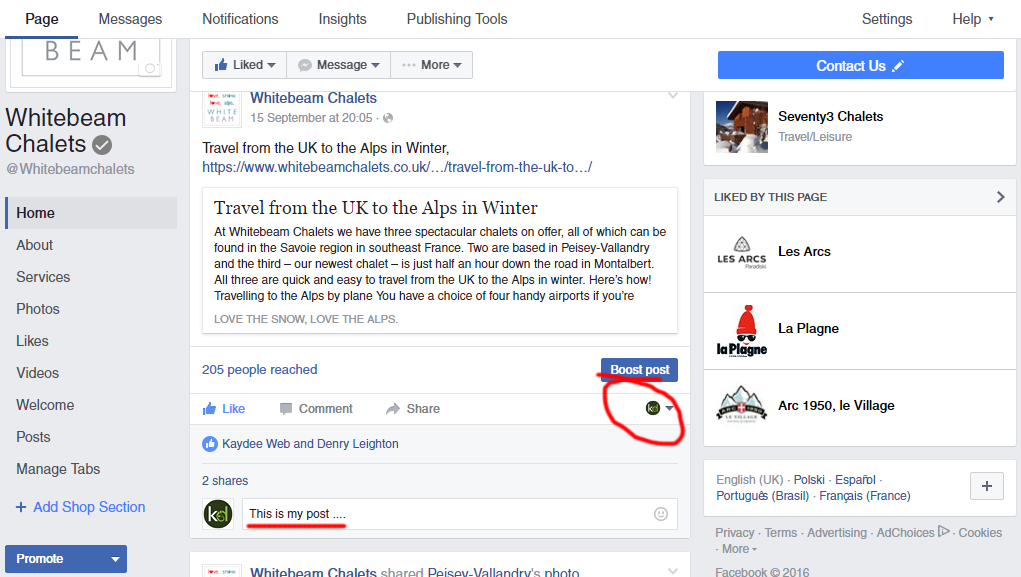
Switch to Page profile
-
Click Create Post
-
Add text and visuals
-
Use relevant hashtags
-
Publish or schedule
How to Add Admin to Facebook Page
A Facebook page allows multiple roles to ensure secure collaboration. Assigning correct roles protects the page and maintains control.
Different roles offer different permissions, making it essential to assign carefully. At Nofal SEO, we manage Facebook page roles strategically to maintain security while allowing efficient teamwork.
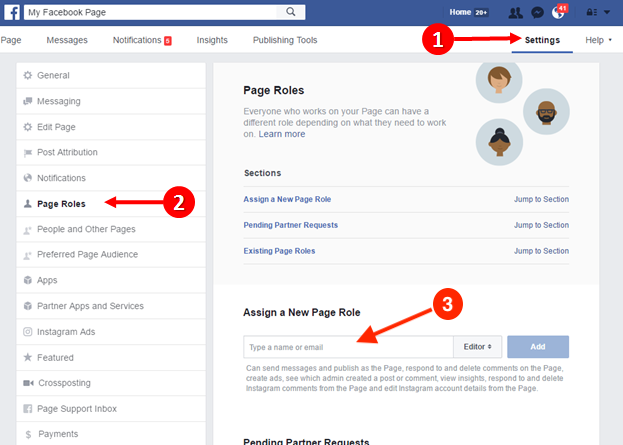
Step-by-Step Role Assignment
-
Open Page Settings
-
Go to Page Access
-
Add person by email/name
-
Choose role
-
Confirm access
How to get 1000 followers on a Facebook profile?
Growing a Facebook page audience often starts with leveraging personal profiles strategically. Engagement, consistency, and value-driven content are essential.
Organic growth depends on interaction, relevance, and content quality—not shortcuts. Using Nofal SEO strategies, we focus on grow Facebook page, increase Facebook page followers, and expanding Facebook page reach organically and sustainably.
Growth Strategy
-
Optimize profile bio
-
Share valuable content
-
Engage in communities
-
Use short-form video
-
Invite followers consistently
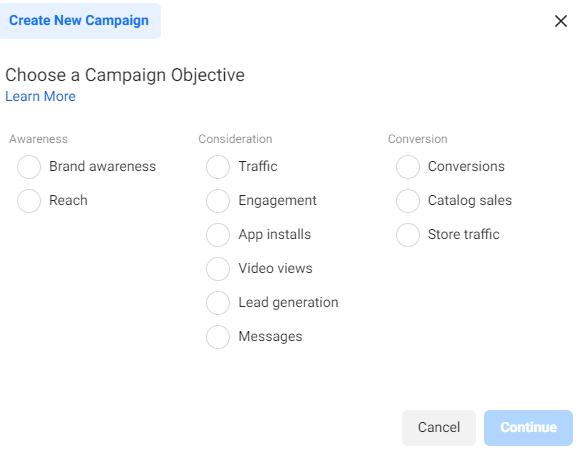
Facebook Ads: A Complete Overview
A Facebook page reaches its full potential when combined with paid advertising. Facebook Ads allow precise targeting and measurable results.
Ads help accelerate growth, increase visibility, and drive conversions faster than organic methods alone. At Nofal SEO, we design Facebook Ads for business with clear objectives, optimized creatives, and continuous performance tracking.
Ad Creation Steps
-
Open Ads Manager
-
Select campaign goal
-
Define audience
-
Set budget and duration
-
Launch and monitor
Facebook Marketing Strategy for Long-Term Growth
A successful Facebook page requires a complete marketing ecosystem combining content, ads, analytics, and messaging.
Long-term growth depends on strategy, consistency, and optimization—not random posting. With Nofal SEO, beginners benefit from Facebook marketing for beginners, structured Facebook page promotion, and data-backed strategies that deliver real business impact.
Marketing Framework
-
Content planning
-
Audience research
-
Organic + paid integration
-
Performance analysis
-
Continuous optimization
Facebook Page Roles Explained (Admin, Editor, Analyst)
A Facebook page supports multiple roles, allowing businesses to work as a team without sharing login credentials. Each role has different permissions, which helps protect the page while enabling collaboration.
Assigning incorrect roles can lead to security issues or loss of control. That’s why understanding each role is critical before granting access. Through Nofal SEO, businesses get structured Facebook page roles management and secure Facebook page admin access, ensuring the right people have the right permissions only.
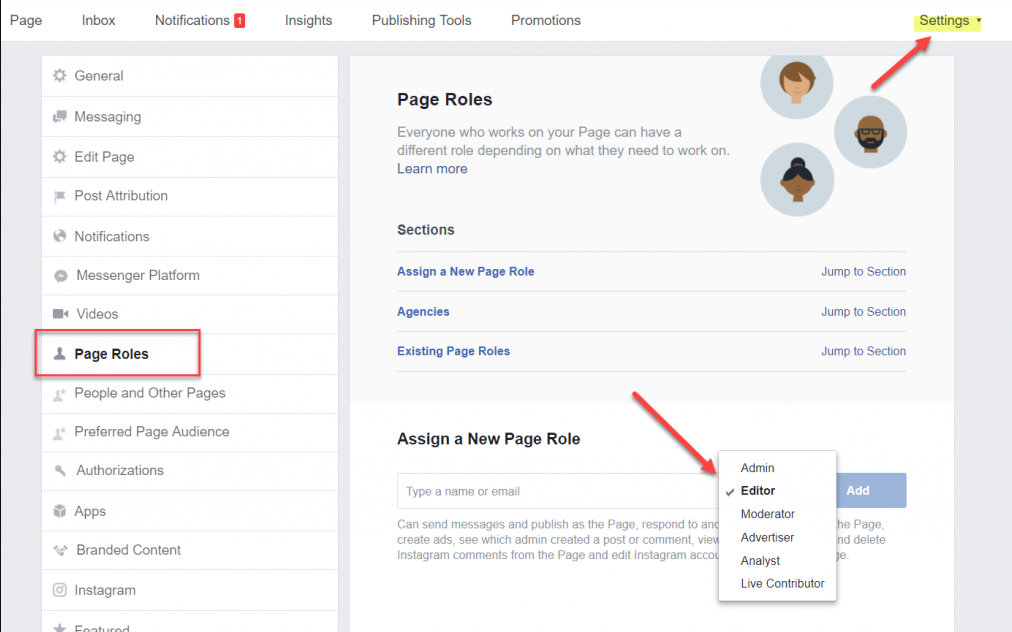
Roles breakdown
-
Admin: Full control
-
Editor: Content + messages
-
Moderator: Comments + inbox
-
Analyst: Insights only
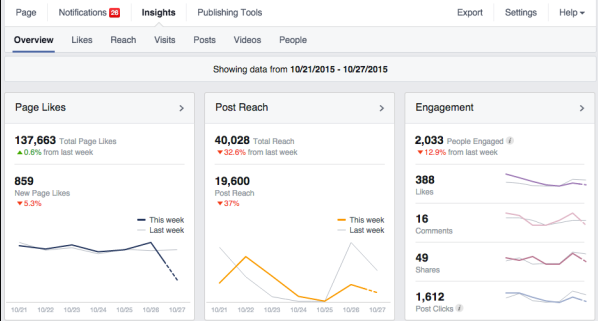
Facebook Page Insights: How to Read Analytics
A Facebook page without analytics is guesswork. Page Insights show how content performs, who your audience is, and what drives engagement, reach, and conversions.
Metrics include reach, impressions, engagement rate, follower growth, and content performance. These insights guide content strategy and ad decisions. At Nofal SEO, we analyze Facebook page insights and Facebook page analytics to optimize posting times, content types, and campaign strategies for measurable growth.
How to use insights
-
Open Page → Insights
-
Review audience demographics
-
Track post performance
-
Analyze reach trends
-
Adjust content strategy
Facebook Page Messenger: Customer Communication Strategy
A Facebook page becomes a customer service channel through Messenger. Direct messaging allows instant communication, faster responses, and stronger trust.
Messenger supports auto-replies, FAQs, business hours, and saved responses, making it ideal for lead generation and support. With Nofal SEO, businesses optimize Facebook page Messenger to improve response time, customer satisfaction, and conversion rates.
Messenger setup steps
-
Go to Page Settings
-
Open Messaging
-
Enable auto-responses
-
Set greeting message
-
Add FAQ responses

Facebook Page Notifications: Never Miss Engagement
A Facebook page notification system ensures you never miss messages, comments, or reviews. Fast responses increase trust and algorithm visibility.
Notification settings can be customized by device, role, and interaction type. At Nofal SEO, we configure Facebook page notifications to ensure businesses respond faster and maintain high engagement signals.
Notification configuration
-
Open Page Settings
-
Select Notifications
-
Enable comments & messages
-
Choose email or app alerts
-
Assign alerts to team members
Do you need a consultation about this topic?
Contact on WhatsApp