

Book a Free Consultation Now
Would you like to know more about this topic?
Contact us on WhatsApp and get a free consultation from our experts
Contact on WhatsApp NowCreate your own transfers events means setting up custom conversion events that allow businesses to track specific user actions beyond standard predefined events. This approach gives full control over how conversions are defined, measured, and optimized, making tracking more accurate and aligned with real business goals. By creating custom transfer events, marketers can focus on high-value actions, improve data quality, and optimize campaigns based on meaningful conversion signals. At Nofal SEO, we help businesses create and manage custom transfer events strategically to ensure precise tracking and stronger campaign performance.
Standard Events and Custom Transfers Events
Standard Events are predefined actions provided by Meta, such as PageView, Add to Cart, Lead, or Purchase. They are easy to set up and work well for common tracking needs. However, Create your own transfers events becomes essential when a business needs to track unique actions that do not fit these default definitions, such as visits to a specific product category or completion of a custom workflow.
Custom Transfers Events offer greater flexibility by allowing advertisers to define conversion rules based on URLs or specific conditions. This makes tracking more precise and aligned with real business goals, especially when standard events are too generic to reflect actual conversion behavior.
This distinction is closely related to conversion accuracy, custom tracking rules, and event flexibility. Standard events provide speed and simplicity, while custom events offer advanced control, granular insights, and better optimization signals. At Nofal SEO, we strategically combine standard and custom events to ensure both ease of setup and high-quality conversion data.
Key differences between Standard Events and Custom Transfers Events:
• Standard events use predefined Meta action names
• Custom transfer events use business-specific rules
• Standard events are quick to implement
• Custom events require strategic configuration
• Standard events offer limited flexibility
• Custom events provide deeper conversion insights
Requirements Before You Create Your Own Transfers Events
Before setting up custom transfer events, several technical and account requirements must be completed to avoid inactive or unusable conversions. Create your own transfers events depends heavily on proper preparation, as missing prerequisites can prevent events from firing or being selected for optimization. Ensuring all requirements are in place allows custom events to activate smoothly and collect accurate data from the start. This preparation phase saves time later and prevents tracking errors that could affect campaign performance.
These requirements are directly linked to pixel readiness, account permissions, and domain verification. Proper setup includes pixel installation, business access configuration, and verified ownership of the website domain. At Nofal SEO, we always validate these requirements before creating custom events to guarantee clean and reliable tracking.
Key requirements before creating custom transfer events:
• An active and correctly installed Facebook Pixel
• Access to Meta Business Manager
• Admin or advertiser permissions on the ad account
• Pixel connected to the correct ad account
• Website domain added to Business Manager
• Domain verification completed successfully
• Website traffic available to trigger events
How to Configure and Activate Custom Transfers Events
Configuring and activating custom transfer events is the step that turns them from inactive definitions into usable conversion signals. Create your own transfers events requires precise configuration, because even a correctly created event will not work unless it is properly activated and linked to a verified domain and pixel. Once configured correctly, custom transfer events can be selected as optimization goals in campaigns and used for accurate reporting. Activation ensures that Meta recognizes these events as valid conversions and begins collecting meaningful data for optimization and attribution.
This process is closely connected to custom conversion setup, event rules, and domain verification. It involves URL-based conditions, pixel selection, and event activation workflows. At Nofal SEO, we follow a structured activation process to ensure custom transfer events move quickly from inactive to fully usable without data loss.
Steps to configure and activate custom transfer events:
• Open Meta Events Manager
• Navigate to Custom Conversions
• Select the custom transfer event
• Click Configure
• Choose the verified website domain
• Confirm the event rules and URLs
• Save the configuration
• Generate website visits to trigger the event
• Monitor event status until it becomes active
Common Issues When You Create Your Own Transfers Events
Even with correct setup, advertisers may encounter issues that prevent custom transfer events from working as expected. Create your own transfers events can become ineffective if errors cause events to remain inactive, fire incorrectly, or fail to appear as available conversion options in campaigns. Most issues are caused by missing verification steps, incorrect URL conditions, or pixel-related problems. Identifying and resolving these issues early is essential to maintain accurate tracking and avoid misleading performance data.
These problems are often related to tracking errors, permission conflicts, and event validation issues. Common challenges include inactive conversions, pixel firing errors, and domain mismatches. At Nofal SEO, we systematically audit these areas to restore clean and reliable conversion tracking.
Common issues when creating custom transfer events:
• Custom conversions remain inactive
• Domain is not verified or incorrectly configured
• Incorrect URL rules defined for the event
• Pixel not firing on the target page
• Insufficient traffic to activate the event
• Missing permissions in Business Manager
• Delayed reporting or missing event data
Final Tips to Optimize Your Own Transfers Events
Optimizing custom transfer events is essential to ensure they deliver long-term value and accurate conversion insights. Create your own transfers events should not stop at creation and activation; continuous optimization helps improve data quality, campaign performance, and decision-making based on real user behavior.
Well-optimized events provide clearer signals to advertising platforms, making optimization more efficient and reducing wasted spend. Regular review and refinement ensure that events stay aligned with business goals as websites, funnels, and user behavior evolve over time.
Optimization is closely linked to conversion performance, event prioritization, and data accuracy. Best practices include event testing, performance monitoring, and rule refinement to maintain reliable tracking. At Nofal SEO, we continuously optimize custom events to support scalable, conversion-focused strategies and consistent campaign growth.
Final tips to optimize your custom transfer events:
• Use clear and descriptive event names
• Track only high-value user actions
• Avoid creating unnecessary or duplicate events
• Regularly test events in Events Manager
• Monitor event performance and activation status
• Update URL rules when website structure changes
• Align each event with a specific campaign objective
Create your own transfers events
Create your own transfers events allows businesses to define custom conversion actions that reflect real user behavior and specific business goals. Instead of relying only on standard events, custom transfer events provide more accurate tracking by focusing on high-value actions such as visits to key pages, product interactions, or completed workflows. This level of control improves conversion measurement, supports better optimization decisions, and helps advertising platforms deliver ads to the most relevant audiences based on meaningful data.
- First we go to the pixel that we created with the name Nofalseo’s Pixel, we will see all the events that have been added.
- In the case of creating a new event other than the standard events that were added before, we click on the create button at the top right of the page.
- Several options appear, from which we choose the last option, which is “Create a custom conversion”, as we can see:
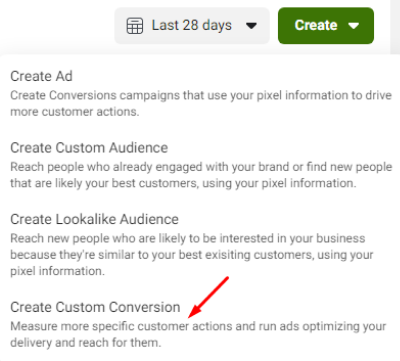
This choice means to create a new event in a non-traditional way, allowing you to Create your own transfers events by setting up private conversions that are not limited to standard event rules.
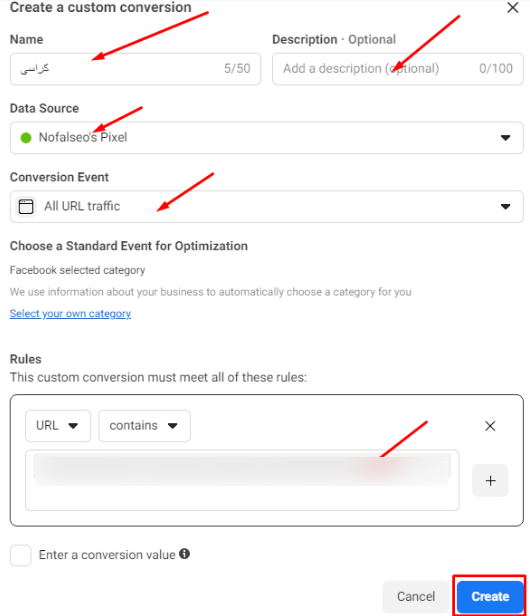
- By clicking on this option, another window appears asking us to select the event. Suppose we want to create an event on a specific product page in our site, let it be a product (chairs).
- In a new tab in Google, I open my site on the page I want to create an event for and take the “url” of the page.
- In the window that opens in front of us, we specify the name of the event, let it be (chairs).
- You can write a description for it. This request is optional.
- After that it asks you to specify the name of the pixel.
- After that, in the “Conversion Event” box, we leave the default option as it is.
- Then we write the “URL” of the page that we specified, you can add more than one “URL”
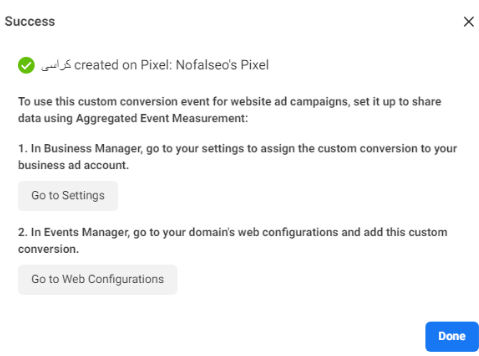
- After that we click on “Create” as we see:
- Then we click on Done as we see:
- Returning to the pixel page, we will find all the “Standard Events” in the pixel. But where do I find the special events I’ve created?
- On the left of the page we find an option called “Custom Conversions” as we can see:
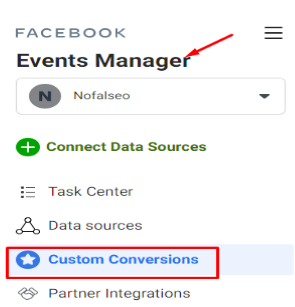
- By clicking on it, you will go to the events creation of the special transformations that you have done now, as we can see:
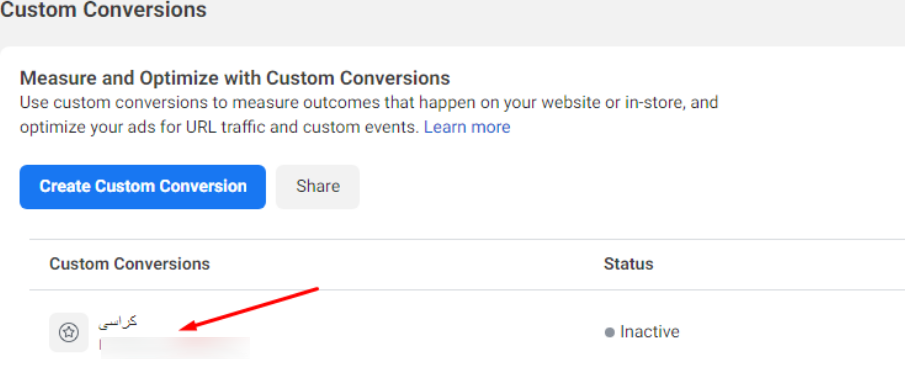
- If we notice that the “conversions” that we have added in the name (chairs) are not “Inactive”, meaning that it cannot be used at the moment.
- To activate it, click on it, a window will appear as you can see:
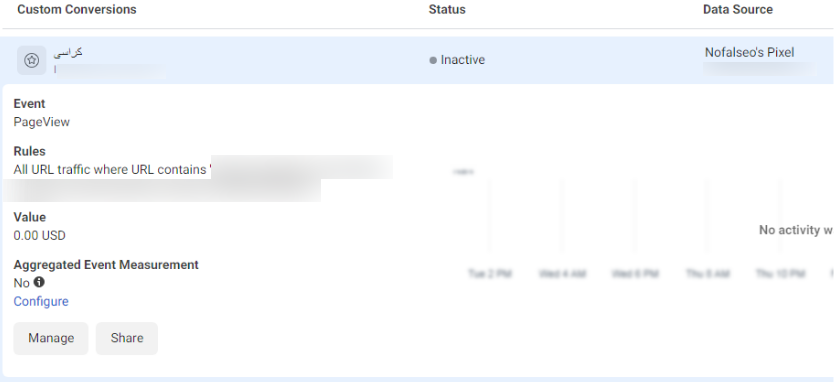
- From that window, click on “Configure”, it will show you all the domains of the sites that you use within the special “Ads account”.
-
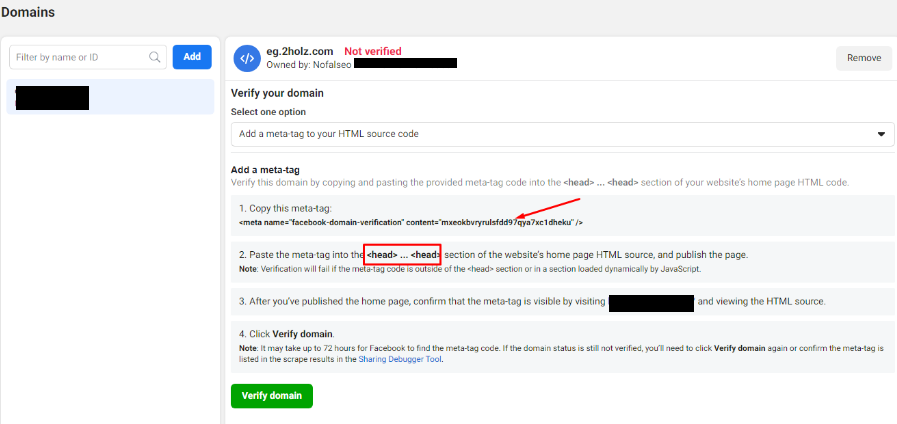
You will find the name of the website you are working on, and next to it a button labeled “Verify Domain.” At this stage, Facebook requires domain verification to allow you to Create your own transfers events, so click the button to confirm ownership.
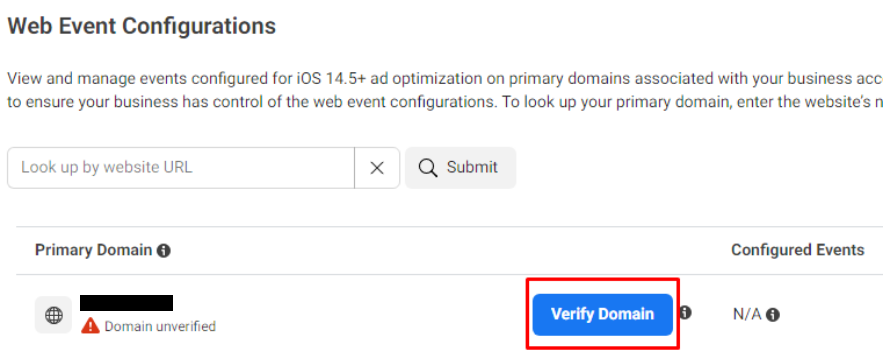
button “verify domain”
- By clicking on it, another window appears, we click on the “Verify Domain” button, as we see:
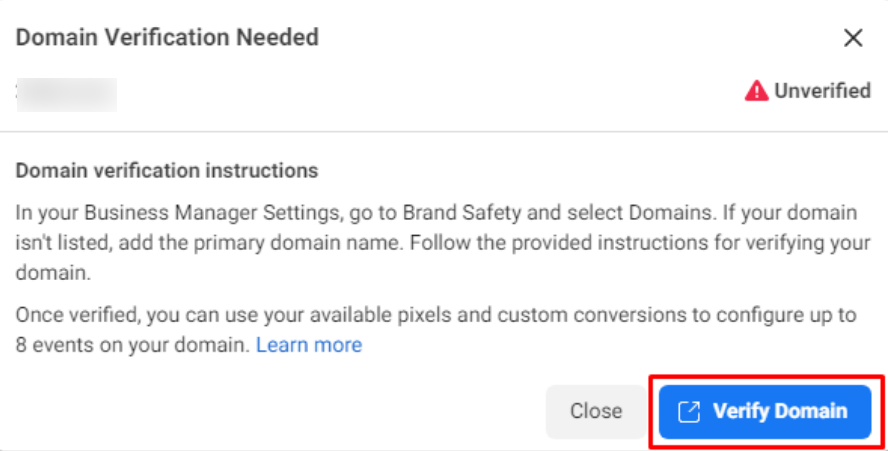
This is a one-time step to confirm that the domain you are using is yours, allowing you to Create your own transfers events and add as many custom events as needed without repeating this verification step.
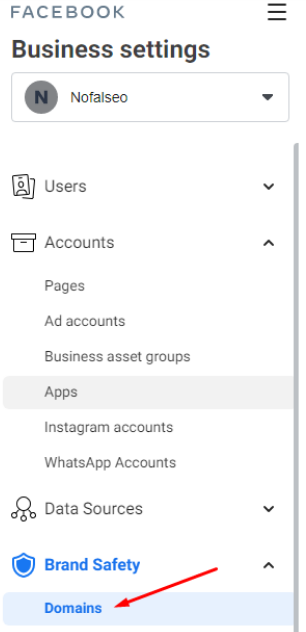
- Click on “Verify Domain”. We will find that he has opened our business account from the left of the page, we choose the option called “Domains” as we see:
- Clicking on the word “Domains” shows us a screen under the name “Add a domain.” We add the domain as we see:
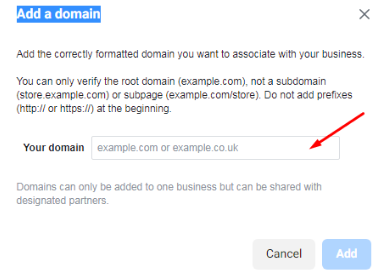
After typing the domain, a screen appears stating that it is necessary to take a copy of the “Meta” and place it on the site as we did in the pixel before that between <head> … <head> as we see:
“control panel”
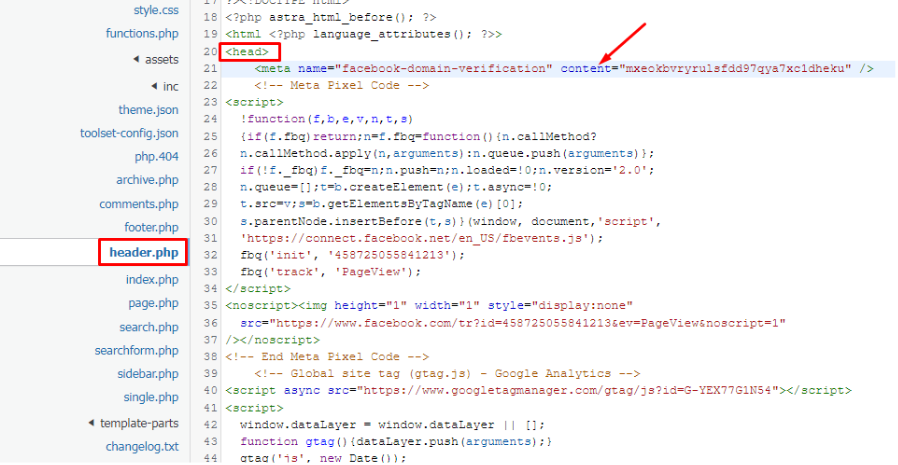
- We enter the site and choose the appearance or “appearance” We choose the template editor or “Theme Editor”
- After that, to create events, a special conversions page will appear. On the left side of that page, we choose “header” to put the “Meta” that we took before.
- The “meta” is placed anywhere between </head> <head> as we can see:
- After that we click on Update or update the file as we did when we created the pixel, but this time we confirm to Facebook Business that the domain that we used is owned by us and valid for use
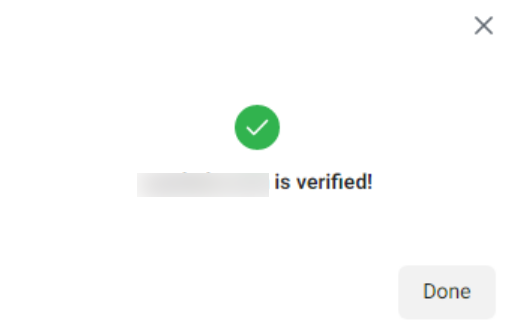
- We return again to Facebook Business and click on “Verify Domain.” A screen appears for sure, we click on “Done” as we see:
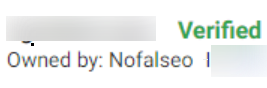
- Now the domain has become “Verified”, i.e. activated, and Facebook Business is sure that it belongs to you and is valid as we see:
- After that, we increase the site and enter the “Conversion” that we specified before, let it be (chairs). This is in order for the site to feel that there are visits made.
- Returning again to the “events manager” we can make “Custom Conversions” from it through “Create” or through “Custom Conversions” directly from the options, we do any “Conversion” with the same steps previously explained.
With this, we have finished the method of creating private conversion events on Facebook, and we will learn in the next article how to create a pixel using plugins.
In conclusion, learning how to Create your own transfers events gives you full control over conversion tracking and helps you measure what truly matters to your business. Custom transfer events improve data accuracy, support smarter optimization, and lead to better campaign performance. If you want to set up and optimize custom transfer events correctly, contact Nofal SEO today and let our experts handle your conversion tracking with precision.
Do you need a consultation about this topic?
Contact on WhatsApp