
How to Create a catalog on Facebook for Ads and Shops

Book a Free Consultation Now
Would you like to know more about this topic?
Contact us on WhatsApp and get a free consultation from our experts
Contact on WhatsApp NowWhat is a Facebook catalog?
A Facebook catalog is a structured product database that allows businesses to showcase, manage, and promote their products across Meta platforms. Through Create a catalog on Facebook, businesses can upload detailed product information such as names, prices, descriptions, images, and availability, enabling Meta to dynamically display products in ads and shops. This catalog acts as the backbone for ecommerce features, allowing products to appear automatically in relevant placements based on user behavior, interests, and intent.
From a functionality perspective, a catalog is not just a product list—it is a dynamic system that connects your inventory with advertising, shopping experiences, and personalization. Using tools like Meta catalog Manager, businesses can keep product data updated in real time, ensuring accuracy across ads and storefronts. A well-built catalog improves visibility, supports automation, and enables scalable selling across Meta’s ecosystem without manual intervention.
Before using a catalog effectively, it’s important to understand its core components and structure:
-
Product data structure: Each item must include required fields like title, price, image, and availability to be eligible for ads.
-
Platform integration: Catalogs connect with ads, shops, and dynamic placements automatically.
-
Automation capability: Updates can be synced via feeds or integrations to reflect real-time changes.
-
Personalized delivery: Products are shown to users most likely to be interested based on behavior.
-
Scalability: One catalog can support hundreds or thousands of products efficiently.
How do I Create a catalog in Facebook?
To Create a catalog on Facebook, you start by accessing Meta’s business tools and selecting the appropriate catalog type based on your business model, such as ecommerce or travel. The setup process involves defining your catalog source, adding products manually or via a data feed, and connecting the catalog to the correct business assets. Once created, the catalog becomes available for use in ads, shops, and other commerce features across Meta platforms.
For businesses aiming to build catalogs correctly from the start, working with specialists like Nofal Seo ensures that catalog structure, permissions, and integrations are optimized for both advertising and long-term scalability. Proper setup inside Facebook Business Manager helps avoid common issues such as missing products, disapproved items, or broken feeds, which can limit ad delivery and reduce performance.
To create a catalog step by step, follow these detailed actions carefully:
1) Prepare before you start
-
Make sure you have a Meta Business Manager account.
-
You must have a Facebook Page connected to your business.
-
Prepare your product details: product name, price, description, product URL, image, availability.
-
If you have an online store (Shopify, WooCommerce, etc.), keep it ready for integration.
2) Go to Commerce Manager
-
Open Meta Business Suite or Business Manager.
-
From the menu, select Commerce Manager.
-
Click on Catalogs.
If you don’t see it, open All tools and choose Commerce Manager.
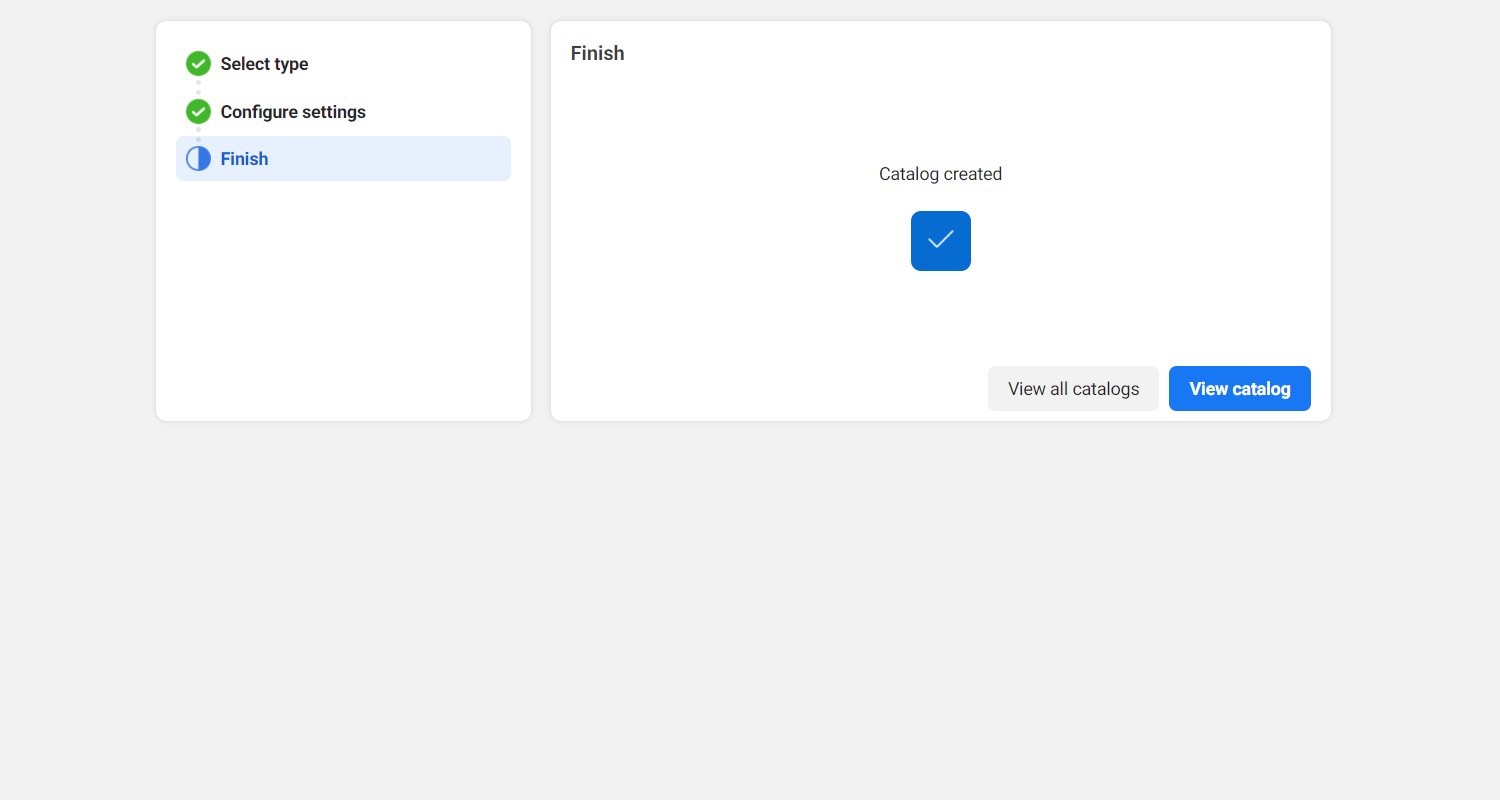
3) Create a new catalog
-
Click Add catalog or Create catalog.
-
Choose the catalog type:
-
E-commerce (for selling products online)
-
-
Click Next.
4) Choose a product data source
You will be asked how you want to add products:
-
Manually add products
-
Upload a data feed (CSV, TSV, XML)
-
Connect a partner platform (Shopify, WooCommerce, etc.)
-
Schedule a feed for automatic updates
Choose the method that fits your business best.
5) Name your catalog and assign ownership
-
Enter a catalog name.
-
Select the Business Manager that owns the catalog.
-
Click Create.
6) Add products to your catalog
A) Manually add products
-
Go to Catalog > Items.
-
Click Add items → Add manually.
-
Fill in:
-
Product name
-
Description
-
Website link
-
Image
-
Price and currency
-
Availability
-
-
Click Save.
B) Upload a product file
-
Go to Catalog > Data Sources.
-
Click Add data source → File upload.
-
Upload your product file.
-
Map the fields if requested.
-
Upload and review errors.
C) Use a scheduled data feed (recommended)
-
Go to Catalog > Data Sources.
-
Choose Scheduled feed.
-
Add your Feed URL.
-
Set the update schedule (daily or weekly).
-
Save and run the first upload.
D) Connect an ecommerce platform
-
Go to Catalog > Partner integrations.
-
Choose your platform (Shopify, WooCommerce).
-
Log in and approve the connection.
-
Confirm that products sync correctly.
7) Review product status and fix errors
-
Open Diagnostics inside the catalog.
-
Fix issues like:
-
Missing images
-
Invalid prices
-
Policy violations
-
-
Update the product source and re-sync.
8) Assign assets to your catalog
-
Open Catalog settings.
-
Assign:
-
Facebook Page
-
Ad account
-
Facebook Pixel (if using catalog ads)
-
-
Save changes.
9) Use the catalog for ads or Facebook Shop
-
For ads: Go to Ads Manager and choose Sales / Catalog ads.
-
For shop: Set up Facebook Shop inside Commerce Manager.
Tips to avoid common problems
-
Use high-quality product images.
-
Keep prices and availability updated.
-
Check Diagnostics regularly.
-
Avoid duplicate product IDs.
Where is my catalog on Facebook?
When you Create a catalog on Facebook, your catalog is stored inside Meta’s commerce infrastructure and can be accessed through your business tools rather than your personal profile. Catalogs are linked to your business assets and appear within the commerce and advertising sections, where they can be managed, edited, and connected to ads or shops. Knowing exactly where to find your catalog is essential to maintain product accuracy, control permissions, and activate catalog-based campaigns efficiently.
From a management and workflow perspective, catalogs are centralized to support selling and advertising at scale. Through Meta Business Suite catalog, businesses can review product status, fix errors, and monitor visibility across platforms. Many businesses rely on Nofal Seo to ensure catalogs are correctly linked, visible to the right ad accounts, and structured to support long-term growth without access or visibility issues.
To locate your Facebook catalog quickly and avoid confusion, follow these clear steps:
-
Open your business tools: Log in to your Meta business environment using the correct account.
-
Navigate to commerce assets: Access the catalog section where all product data is stored.
-
Check assigned assets: Ensure the catalog is connected to the right page and ad account.
-
Review permissions: Confirm that you and your team have the required access level.
-
Verify catalog status: Make sure the catalog is active and not restricted or disabled.
Facebook Catalogue Product Requirements
Before you Create a catalog on Facebook, all products must meet specific technical and policy requirements to be approved and displayed correctly. These requirements ensure that product information is consistent, accurate, and compliant with Meta’s commerce standards. Missing mandatory fields, low-quality images, or incorrect pricing can prevent products from appearing in ads or shops, limiting your catalog’s effectiveness.
From a quality and compliance standpoint, meeting these requirements improves product approval rates, strengthens catalog health, and supports seamless delivery in Meta catalog ads. Proper formatting inside Facebook catalogue Manager ensures products are eligible for dynamic ads, remarketing, and personalized recommendations, while reducing disapproval risks and data errors.
Before publishing products, carefully review the following essential requirements:
-
Product titles and descriptions: Must be clear, accurate, and free of misleading claims.
-
Pricing and availability: Prices should match your website and update automatically if possible.
-
High-quality images: Products must have clear images with no excessive text or watermarks.
-
Unique identifiers: Use IDs or SKUs to avoid duplication and tracking issues.
-
Policy compliance: Products must follow Meta’s commerce and advertising policies.
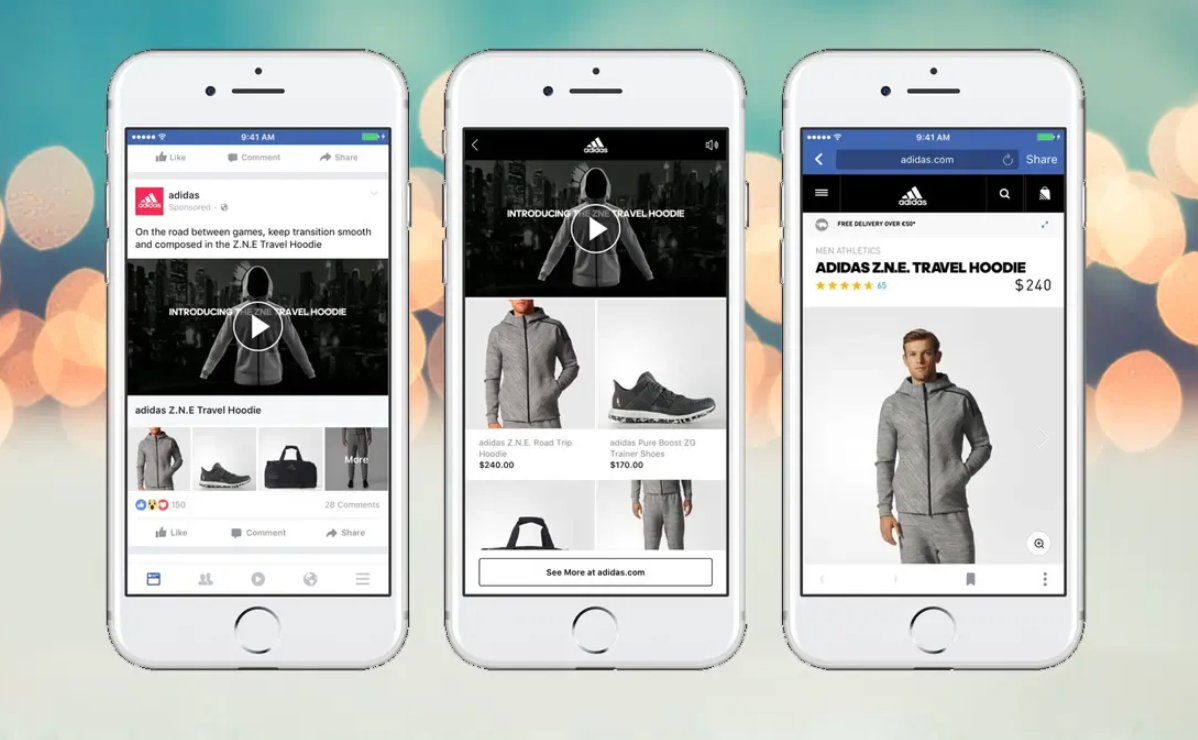
Facebook catalog example
A practical Facebook catalog example shows how businesses use product catalogs to automatically display relevant items to users based on their behavior. When you Create a catalog on Facebook, products can appear dynamically in ads, shops, and remarketing campaigns without manual selection. For example, an ecommerce store can upload all its products once, then allow Meta to show the most relevant items to users who viewed, added to cart, or showed interest in similar products, making selling more personalized and scalable.
From a real-world implementation perspective, catalog examples highlight how automation improves performance and efficiency. A well-built catalog can power Facebook Shop, dynamic ads, and cross-platform placements with minimal ongoing effort. This is why Nofal Seo helps businesses design catalog structures that align with real buying behavior, ensuring products are displayed correctly, approved faster, and optimized for conversion-focused advertising.
To understand a strong catalog example, focus on these practical elements:
-
Complete product data: Each product includes title, price, description, image, and availability.
-
Behavior-based delivery: Products are shown based on views, clicks, and purchase intent.
-
Dynamic advertising: Ads automatically pull relevant products without manual updates.
-
Shop integration: Products sync seamlessly with storefronts and shopping experiences.
-
Scalable structure: One catalog supports ads, shops, and remarketing together.
How to Set Up Your Facebook Product Catalogue Feeds
To Create a catalog on Facebook, setting up a product catalogue feed is essential for keeping product information accurate and up to date. A feed acts as the data source that regularly syncs your product details—such as pricing, availability, and images—into your catalog. Proper feed setup ensures that changes on your website are reflected automatically, reducing manual work and preventing mismatches between ads and landing pages.
From a technical standpoint, feeds support data synchronization, catalog automation, and long-term scalability. Using tools like Facebook Helper, businesses can troubleshoot feed errors, validate updates, and maintain catalog health. A clean feed structure improves approval rates, reduces disapprovals, and ensures consistent performance across ads and shopping placements.
To set up your product catalogue feed correctly, follow these detailed steps:
-
Choose your feed source: Use scheduled uploads, file uploads, or platform integrations.
-
Format product data correctly: Ensure required fields are filled and match Meta standards.
-
Schedule regular updates: Keep prices, stock, and images in sync automatically.
-
Test feed accuracy: Check for errors, missing fields, or rejected items.
-
Monitor feed health: Review warnings and fixes to maintain consistent delivery.
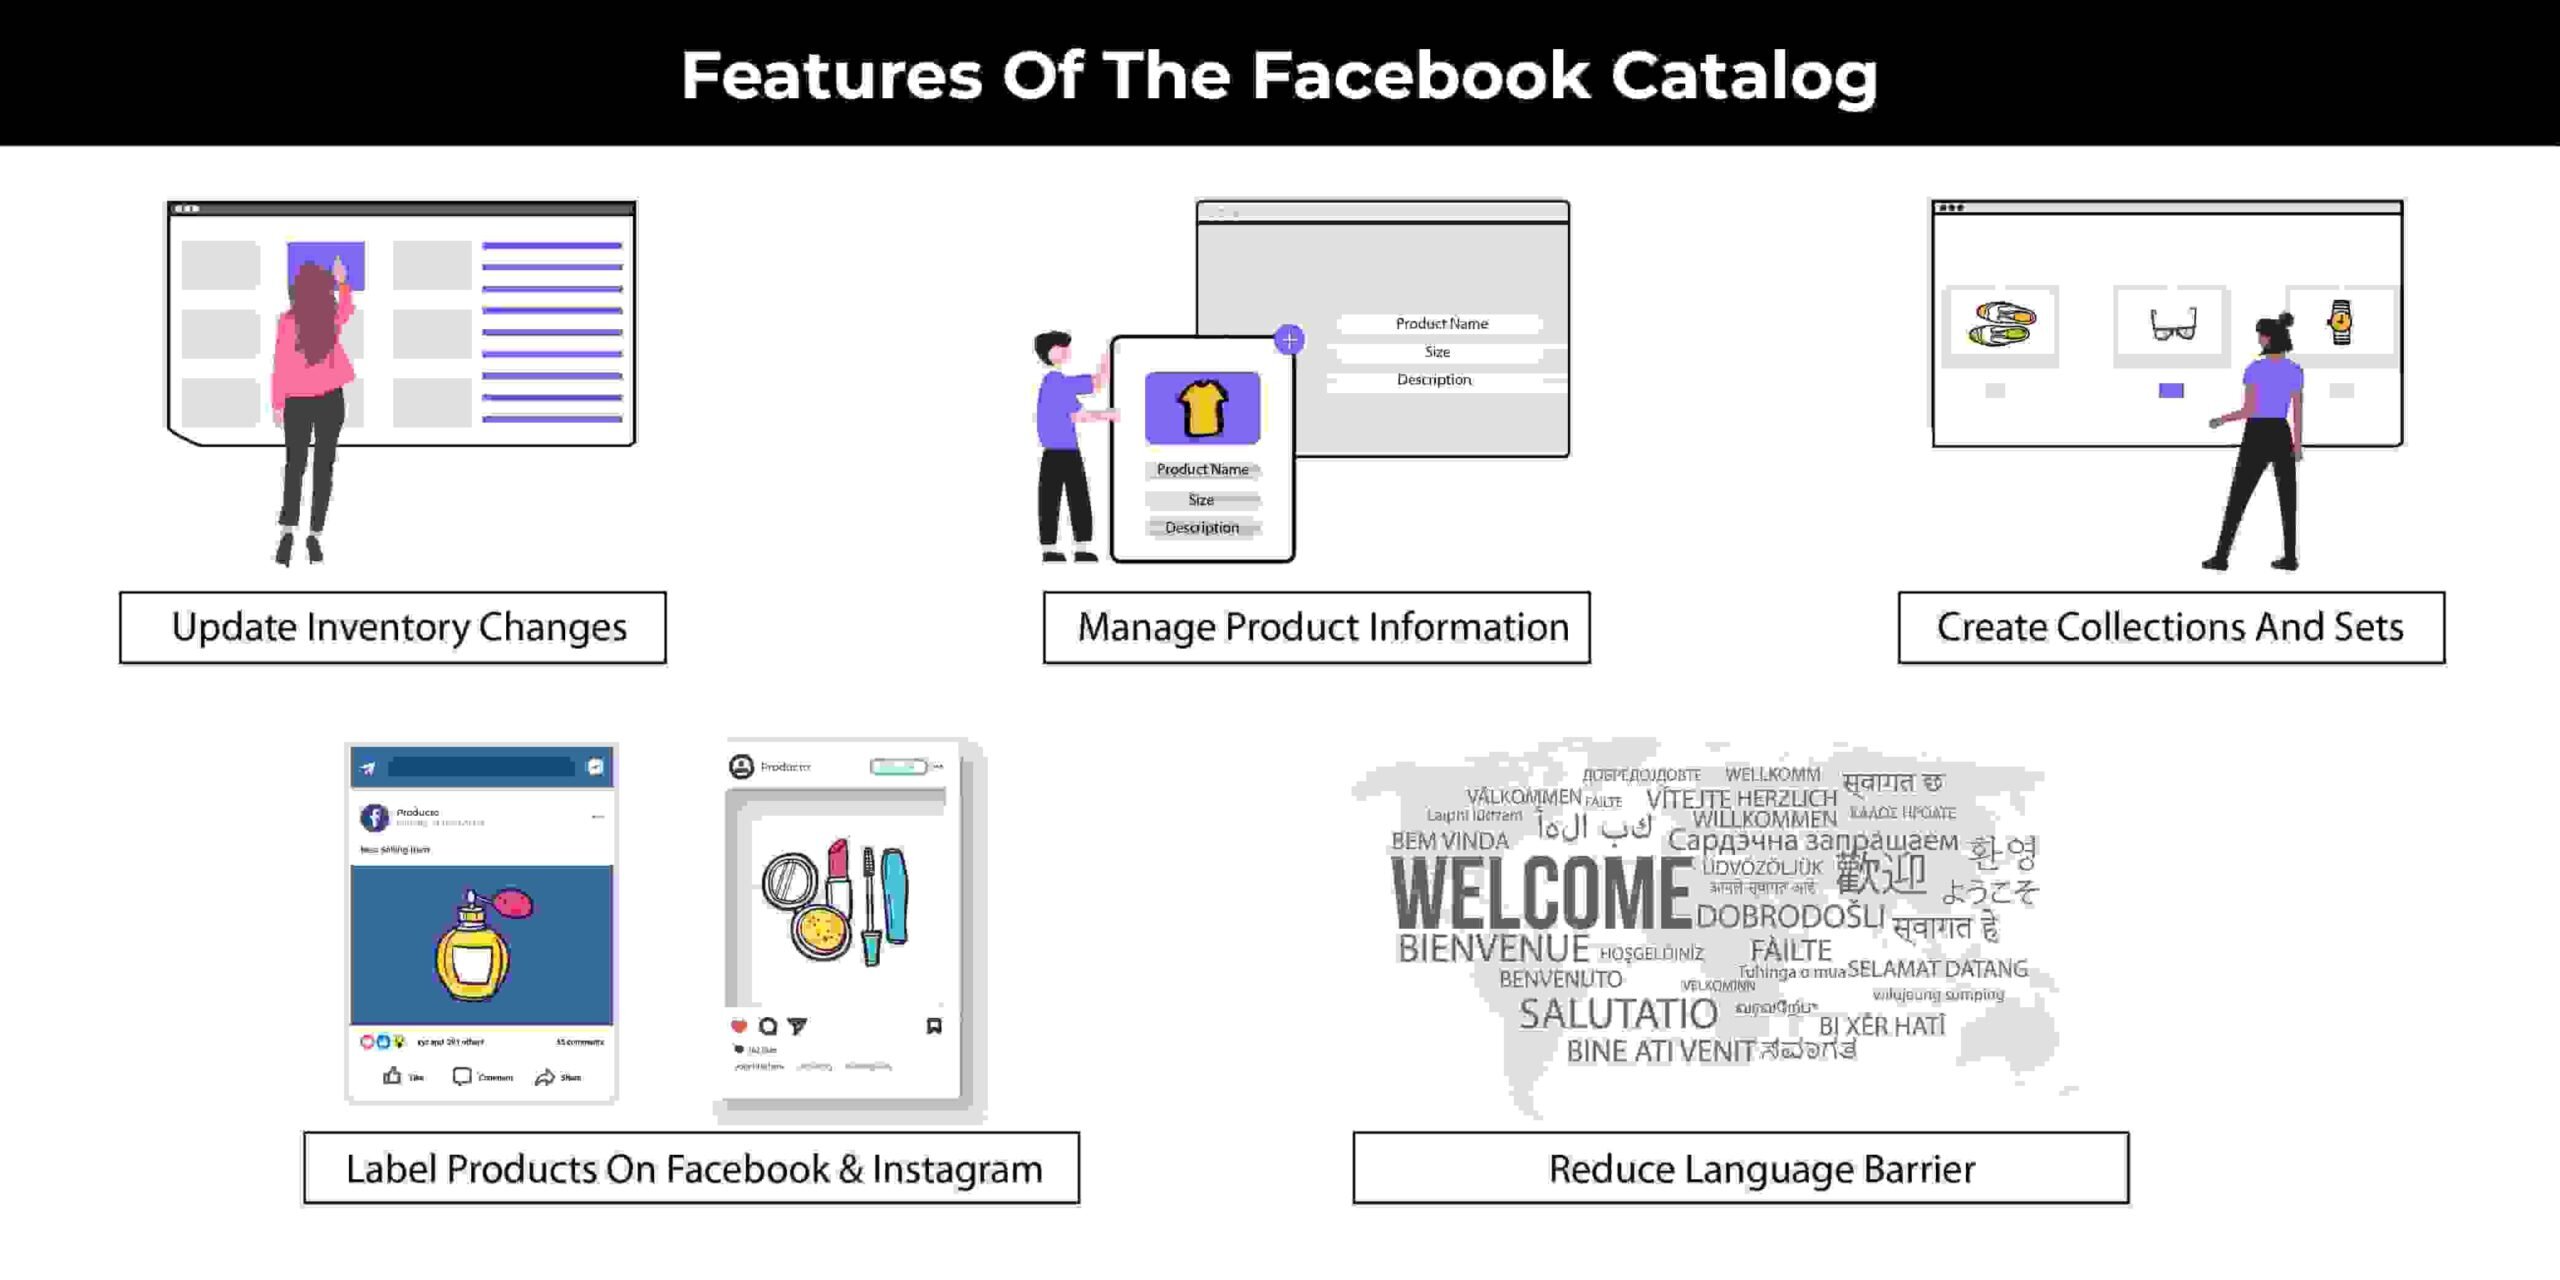
How a Facebook Product Catalog Benefits Your Shop
When you Create a catalog on Facebook, your shop gains a centralized system that connects products directly with ads, shopping experiences, and user behavior across Meta platforms. A product catalog allows your store to automatically show relevant items to potential customers based on their interests, browsing history, and purchase intent. Instead of managing products manually for every campaign, the catalog enables automation, consistency, and scalability—making it easier to grow sales without increasing operational effort.
Beyond visibility, catalogs play a critical role in turning interest into action. By structuring product data correctly, your shop can leverage dynamic product delivery, improve ad relevance, and shorten the customer journey from discovery to purchase. This is why businesses working with Nofal Seo benefit from catalog setups that are not only technically correct, but also strategically optimized to support long-term ecommerce growth and measurable performance.
How product catalogs drive growth
-
Improved conversion rates: With dynamic product ads, users see items they are most likely to buy.
-
Stronger ad personalization: Catalogs support personalized shopping experiences across platforms.
-
Better inventory management: Centralized updates reduce errors and outdated listings.
-
Scalable advertising: One catalog supports multiple campaigns without duplication.
-
Higher ROI: Automated delivery improves ad efficiency and reduces wasted spend.
Do you need a consultation about this topic?
Contact on WhatsApp